CNS Menu Plug-in

CNS Menu allows you to place hierarchal menus anywhere on a FileMaker layout. When a menu item is chosen, the script of your choice in the database of your choice is performed.

Features

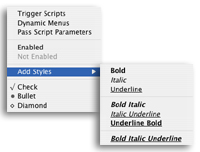
  • Dynamically create popup menus
  • Easily convert return delimited items such as value lists, layout names, and more, into QuickMenus.
  • Add style to menu items such as bold, underline, italic, and any combination of those.
  • Add bullets to your menu items including check, circular bullet, and diamond.
  • Pass script parameters through menus to your scripts.
  • Enable and disable menu items on the fly.
  • Update menu items dynamically.
  • Precisely display menus using left, top, align, and minWidth.
  • Use the built in MenuBuilder to quickly build XML menus - without having to learn XML.
  • Use modifier keys to display alternate menu items including Shift, Control, Command, Option, and Alt.
  • Get mouse coordinates with the CNSMenu_GetMouseCoordinates function.
  • Get the mouse button number clicked with the CNSMenu_GetMouseButton function.
  • Simple data entry by allowing a user to find items quickly through sub menus.
  • Display a user friendly menu item, but pass a value such as a Customer ID to your scripts.
  • Load an XML menu from your hard drive.

Documentation Overview

The following is a description of each section of the CNS Menu documentation.

Overview of Chapters

The following is an overview of the chapters in the CNS Menu documentation.

Chapter 1: Introduction
Chapter 2: Installation, Configuration, and Registration
Chapter 3: CNS Menu Example Database

CNS Menu ships with the "CNS Menu.fp7" example database which includes 15 examples demonstrating ways to use and understand the CNS Menu plug-in. The database is fully unlocked so you can explore every detail. We have also included the documentation for each example inline, so you can both examine the example and see its explanation all from one layout.

Chapter 4: MenuBuilder

Creating menus is now easier than ever! MenuBuilder allows you to create and edit menus without having to edit XML.

Chapter 5: Credits & Contact Information

Overview of Appendixes

The following is an overview of the appendixes in the CNS Menu documentation.

Appendix A: Functions

Contains a list of all available functions and a complete description of each.

Appendix B: XML Definitions

Contains a list of all available XML tags found in CNS Menu and a complete description of each.

Appendix C: Function Error Responses

Chapter 1

Introduction

Introduction

CNS Menu allows you to place hierarchal menus anywhere on a FileMaker® Pro layout. When a menu item is chosen, the script of your choice in the database of your choice is performed. Menus can have any number of sub menus and can be displayed with a variety of styles and bullet marks. Creating menus with CNS Menu is as easy as handing the plug-in a return-delimited list of menu items to display. Your menu items can have a display name, and a value that can be used in your scripts, so the end user can see useful information such as a customer name while the value can be a Customer ID number.

CNS Menu ships with the "CNS Menu.fp7" example database which includes 15 examples demonstrating ways to use and understand the CNS Menu plug-in. The database is fully unlocked so you can explore every detail. We have also included the documentation for each example inline, so you can both examine the example and see its explanation all from one layout. Examples include, QuickMenu, Menu Placement, MenuBuilder, Value List to QuickMenu, Hidden Items, Menu Decoration, Mouse Grabber, Right Click, Data Entry, Layout Navigation, Update Menu Item, Bookmark Example, External XML Menu, and RSS Menu.

CNS Menu has many advantages over its predecessor, SCRIPTit. This rendition includes MenuBuilder in the configuration dialog which allows you to quickly build new menus without having to know XML. You can then simply use menus built in MenuBuilder in your database, or copy the XML which is generated for you. CNS Menu also includes a brand new way to create menus called "QuickMenus". A QuickMenu takes a return-seperated list of items and creates a menu for you without having to know or use any XML.

Chapter 2

Installation, Configuration, and Registration

Installation

Installing CNS Menu is very easy. If FileMaker® Pro is open, then close it. Next, locate the folder on your hard drive that contains your FileMaker Pro application. For Macintosh, this is usually in the Applications folder; while on Windows, it is usually in the Program Files folder. Next to the FileMaker Pro application, you should see a folder named Extensions. Copy the plug-in file into this folder to install it into FileMaker Pro.
Figure 2.1 Installation

After installing the plug-in as described above, you can open FileMaker Pro again and the plug-in should automatically be active. You an then open the "CNS Menu.fp7" database to begin exploring CNS Menu.

Configuration

Basics

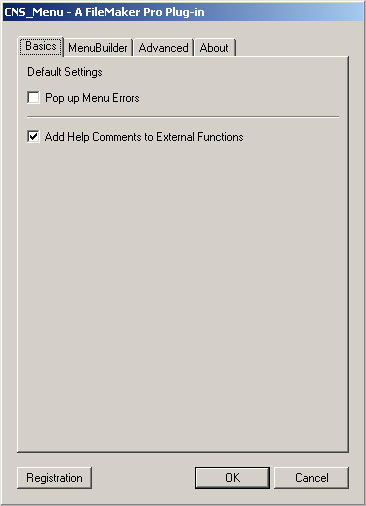
Once the Configuration Dialog is open, click the Basics tab where you can set the following values. The Pop up Menu Errors check box allows you to enable or disable Popup dialogs that display menu errors. See "CNSMenu_PopupMenuErrors" in Appendix A for more information about using the Pop up Menu Errors option. The Automatically set empty values to the menu item name check box allows you to tell the plug-in whether or not to use the menu item name as the value of the menu item if a value is not defined. The Add Help Comments to External Functions check box allows you to turn off the help comments that are inserted into your calculation when you double-click a function from the list of external functions.

Figure 2.2 Basics Tab

MenuBuilder

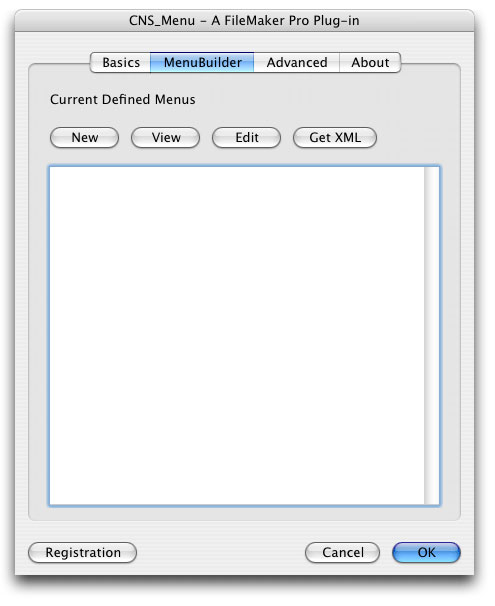
The MenuBuilder Tab allows you to create and edit menus. See Chapter 4 for more information about creating and editing menus here.

Figure 2.3 Menus Tab

Advanced

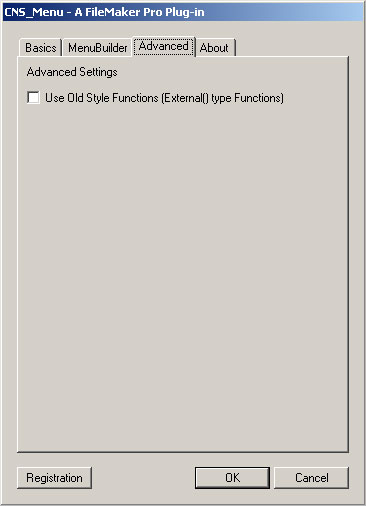
The Advanced Tab allows you to define whether the New style functions, the Old style functions, or both are enabled. The New style functions look like CNSMenu_ShowMenu("some menu"), while the Old style functions look like External("Scrp-ShowMenu", "some menu") which is useful if you had a database created that worked with the SCRIPTit plug-in. In order for the old syle functions to change, you must uncheck and recheck CNS Menu in FileMaker Pro's Application Preferences dialog, or restart FileMaker Pro.

Figure 2.4 Advanced Tab

About

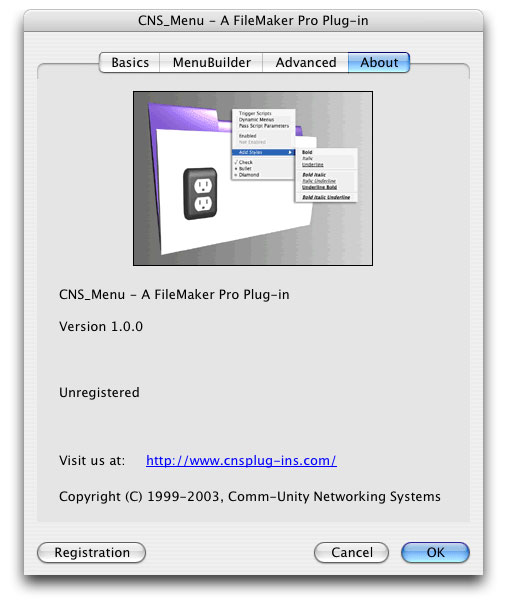
The About Tab reports which version of CNS Menu you are using, who the plug-in is registered to, and how many seats the plug-in is registered for. You can also use the "CNSMenu_ShowConfigDialog" function to bring up the Configuration Dialog. To make sure that you have the most recent version of CNS Menu, please visit our website (http://cnsmenu.cnsplug-ins.com/)

Figure 2.5 About Tab

Registration

When you decide to purchase CNS Menu, you can obtain a license from our secure online purchase form at https://secure.comm-unity.net/purchase.htm. Once you have purchased a license to use CNS Menu, we will send you a license key to register your copy of the plug-in. To do that, open any of the example databases and press the "Register CNS Menu" button and enter your license key information.

Chapter 3

CNS Menu Example Database

CNS Menu ships with the "CNS Menu.fp7" example database which includes 15 examples demonstrating ways to use and understand the CNS Menu plug-in. The database is fully unlocked so you can explore every detail. We have also included the documentation for each example inline, so you can both examine the example and see its explanation all from one layout.

Following is a list and description of each example included. For greater detail, read the documentation for each example in the "CNS Menu.fp7" database.

Menu Examples Database

QuickMenu Example
This example demonstrates the use of the CNSMenu_DefineQuickMenu function to quickly create a menu out of a return-delimited list. This allows you to build menus out of things like value lists, layout names, table names, and more. It is extremely flexible because you can quickly grab text from a variety of places and hand it off to the plug-in to build and show a menu. With a quick menu, you can build a full menu structure including sub menus, and a value for each menu item.
Menu Placement Example
With CNS Menu, you have several choices as far as where the menu will show up. You can have it show up under your mouse cursor, or you can specify specific coordinants on your layout. With the aid of FileMaker's "FieldBounds" function, you can actually attach a menu to a field. If you ever need to move that field to a different place on your layout or even copy it to a different layout, the menu will still show up in the proper place.
MenuBuilder Example
This example introduces the "MenuBuilder" which is built into the configuration dialog in the FileMaker preferences. The basic idea is, you can create menus using a simple user interface. You can then view the menu as normal from your layouts. You can also get the XML for the menus you create while in the MenuBuilder. If you are new to XML, you may want to use the MenuBuilder and then view the XML to see exactly what the XML structure looks like for a CNS Menu.
Value List to QuickMenu Example

There are several functions built into FileMaker that you can easily use with a QuickMenu including: ValueListItems, ValueListNames, WindowNames, DatabaseNames, TableNames, LayoutNames, FieldNames, ScriptNames. You could also use the Get ( ScriptParameter ) function to list items via the script parameter when a script is called.

This example demonstrates two of the above items:
Value List example
This example takes the value list "ValueListtoQuickMenu" and displays it as a CNS Menu. There are several advantages to using a CNS Menu over using the built in FileMaker pop-up menu. The menu displayed matches the operating system you are on. You also have the ability to divide menu items into sub menus, and each menu item can have both a name and value associated with it. Lastly, you can call a script when a menu item has been chosen and use the menu choice and value in your target script.
Script Parameter example
This example demonstrates using FileMaker's Get (ScriptParameter) function to display a menu. In other words, you can have one script which displays a variety of menus based on values in a script parameter of a button or when calling a script from another script. There are two menus for this example showing that the same script is called, but the script parameters are different.
Hidden Items Example
This example exercises the "modifierkeys" parameter of the "menuitem" tag. The "menuitem" tag simply represents one menu item in your menu. The "modifierkeys" parameter restricts your menu item to showing only when the specified modifier key or keys are held down when the menu is shown. Modifier keys include shift, ctrl, opt, and cmd. You can also combine modifier keys such as cmd+opt, ctrl+shift, and ctrl+cmd+opt.
Menu Decoration Example
You can decorate your menu items with several different types of things. For example, you display the text of the menu item as bold, italic, underline, or a combination of any of those. You can also add three types of bullets to the front of the menu item including, a diamond, a circular bullet, and check mark. Lastly, you can have a menu item enabled or disabled. When an item is disabled, you cannot choose it and it is dimmed out.
Mouse Grabber Example

This example demonstrates the use of the CNSMenu_GetMouseCoordinates function which returns the coordinates where the mouse clicked. When you click on a color in a container field, a dialog is displayed telling you what color you clicked on as well as information for where the mouse was clicked.

Though you can use coordinates anywhere on the screen, this example compares where you click on the layout with where the container field is and continues from there. Because of this, you can move the container field around the layout or even copy it to an different layout and you will still have correct results.

Right Click Example
This example demonstrates the ability to show different menus based on what mouse button you use to click with. It uses the CNSMenu_GetMouseButton function and then displays the appropriate menu based on the button number that the function returns. The menu items for both the left and right menus are stored as value lists.
Data Entry Example
CNS Menu can aid in entering data into fields. At first you may wonder what the difference is between using a CNS Menu or just a pop-up menu in FileMaker Pro. The first noticeable thing is the graphic user interface. When you use CNS Menu, you get a menu that matches the platform you are on, rather than FileMaker Pro's proprietary menu. The second thing is you can have your menu items display anything you wish, while your menu item value can be any value. For example, if you have a customer database, you can list your customers alphabetically, with their IDs being the item value. When you click on the menu item, you can run a script to locate your customer based on their unique ID number. Which brings us to the third difference. When using CNS Menu you can trigger a script based on the menu item that you choose. Lastly, with CNS Menu, you can have hierarchial menus. For example, you could display all of your customers in one menu that are split up into submenus which are the letters of the alphabet.
Layout Navigation Example
The Layout Navigation Example simply creates a menu which lists all of the layouts in the database. Upon choosing a menu item, a new window is opened to the layout chosen. The example uses the built in FileMaker Pro function "LayoutNames" for the current database to generate the menu items.
Update Menu Item Example
This example demonstrates the ability to update menu items after a menu has already been created. You can update any type of menu, including QuickMenus, XML menus, and XML menus which have been loaded from a file. The example shows you how to update a menu item style, mark, and enabled status.
Bookmark Example
This example shows a very simple bookmark system. It allows you to add bookmarks for the current record so that you can return to them at a later time. You can also shift click to remove a bookmark.
External XML Menu Example
CNS Menu allows you to load a menu from an XML file on your hard drive by using the CNSMenu_DefineMenuFile function. This can be useful if you have menus that are mostly dormant, though you can insert and update any menus once they are loaded. It can also be handy for updating solutions as you can simply replace the xml file on the hard drive to update a menu. This specific example loads a menu full of web page urls for products. Since this content is static, it works well as an XML file.
Recent Records Example
This example demonstrates a recent records menu, similar to a "Recent Files" menu like you see in many applications. It basically records what records you visit and then creates a menu so that you can easily return to the last 5 records.
RSS Menu Example

RSS is an XML format that is popular on the net for easily distributing headlines and news. It has been very popular for syndicating blogs and news sections on website. We have a handful of rss feeds at CNS and there are a small handful of other FileMaker related feeds starting to show up on the net.

This example is a very basic RSS reader. You can update feeds from the net at the click of a button, and then view the headlines in a CNS Menu. When you choose an news item from the menu, your web browser will open and display the full news story. The example also demonstrates using a value list to update several menu items by putting a check mark by the items you have read.

Chapter 4

MenuBuilder

Creating menus is now easier than ever! MenuBuilder allows you to create and edit menus without having to edit XML.

Creating and Editing a Menu

First, open FileMaker® Pro and then open up the CNS Menu configuration dialog. To do this on Windows, go to the "Edit" menu, and select "Preferences". This should bring up the "Preferences" dialog. Next, click on the "Plug-ins" tab, double-click the CNS Menu plug-in, and select the "Menu Builder" tab. On Mac OS X, go to the "FileMaker Pro" menu, and select "Preferences". This should bring up the "Preferences" dialog. Next, click on the "Plug-ins" tab, double-click the CNS Menu plug-in, and select the "MenuBuilder" tab. This list shows all menus that have been created, either through MenuBuilder or through an external function.

Figure 4.1 MenuBuilder

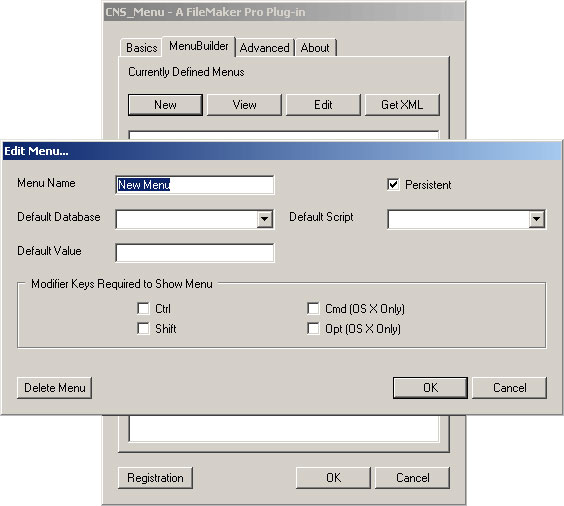
To create a new menu, click the "New" button. The "Menu Name" field is where you specify the name of the menu. The "Persistent" check box, when checked, saves the menu even after FileMaker Pro is closed. It does this by saving an XML file in the "Extensions" folder where the plug-in is installed. By default, a menu created in MenuBuilder will be persistent. Alternatively, a menu created through an external function will not be persistant by default. The "Default Database" field is the default database for all the menu items contained in this menu. If you do not specify a database when defining a menu item, this default database will be used. The "Default Script" field defines the default script for all the menu items contained in the menu. If you do not specify a script when defining a menu item, this default script will be used. The "Default Value" field defines the default value for all the menu items contained in this menu. If you do not specify a value when defining a menu item, this default value will be used. The Modifer Keys check boxes allow you to define keys that are required in order to show the menu. If the specified modifier keys are not held down when you call CNSMenu_ShowMenu, then the menu will not be shown. Instead, the default script will be called in the default database. If you are making a cross-platform solution, you will only want to use the "Ctrl" and "Shift" modifier keys because windows does not have the "Cmd" and "Opt" keys. Click the "Ok" button when you are finished editing to save your changes.

Figure 4.2 MenuBuilder - New Menu

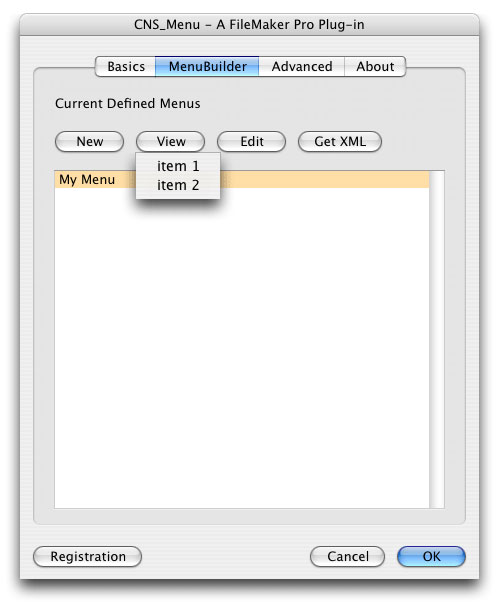
Once you have created a menu, you can select it from the list and click the "View" button to show the menu. This allows you to see what the actual menu will look like without having to go back to your layout.

Figure 4.3 MenuBuilder - View

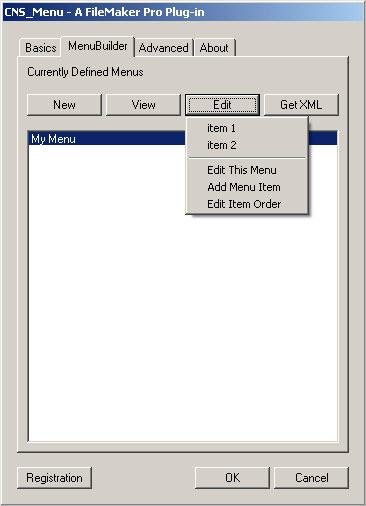
To edit your menu, select it from the list and click the "Edit" button. This opens your menu in an editing mode where you can change all aspects of the menu. At the bottom of the menu are three editing menu items, including "Edit This Menu", "Add Menu Item", and "Edit Item Order".

The "Edit This Menu" choice allows you to change the settings for the current menu. These are the same settings as described above when creating a new menu. This window also allows you to delete your menu by clicking the "Delete Menu" button.

The "Add Menu Item" choice allows you to add menu items, submenus, separators, and insert menus.

The "Edit Item Order" choice allows you to rearrange the order of your items on the current menu.

Figure 4.4 MenuBuilder - Edit

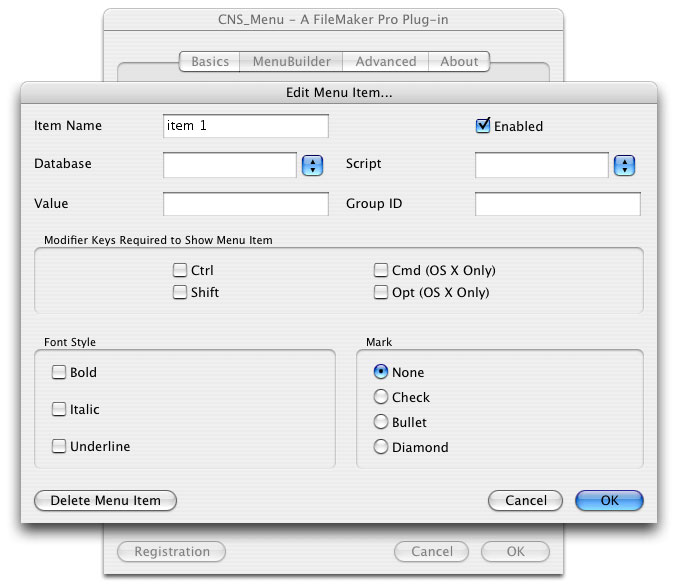
To edit a menu item, click on it to open the editing window for that item. The "Item Name" field is where you specify the name of the menu item. This name will appear on the menu. The "Enabled" check box defines whether or not the menu item is enabled. If the menu item is disabled, it will appear greyed and the user will not be able to select it. The "Database" field defines the database that contains the script for this menu item. If this is not defined, the default database from the parent submenu or menu will be used. The "Script" field defines the script to be called when the user selects this menu item. If this is not defined, the default script from the parent submenu or menu will be used. The "Value" field defines a user-supplied value for this menu item. This value can be retrieved using the CNSMenu_GetMenuValue function. The "Group ID" field defines a user-supplied group identifier for this menu item. This is used in conjunction with the modifierkeys attribute to selectively show alternative menu items depending on which modifer keys are held down. The "Modifer Keys" check boxes allow you to define the modifier keys that are required in order to show this menu item. If the specified modifier keys are not held down when this menu is shown, this menu item will not be shown. If you are making a cross-platform solution, you will only want to use the "ctrl" and "shift" modifier keys because windows does not have the "opt" and "cmd" keys. The "Mark" radio buttons define the mark that is displayed to the left of the menu item. Click the "Ok" button when you are finished editing to save your changes.

Figure 4.5 MenuBuilder - Edit Menu

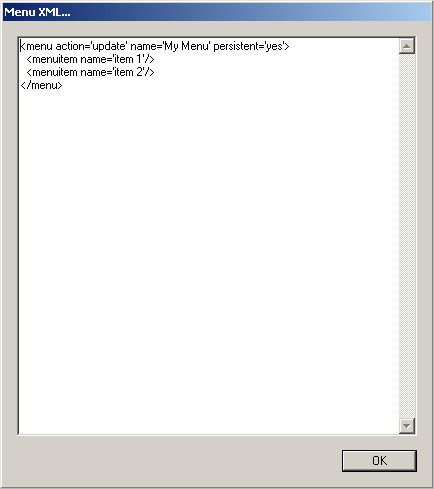
Lastly, select a menu from the list, and click the "Get XML" button. This window allows you to view the XML for each menu. From here you can copy and paste the XML to wherever you need it.

Figure 4.6 MenuBuilder - XML

Chapter 5

Credits & Contact Information

Credits

Programming and documentation by Jake Traynham
Concept, web design, and example databases by Jesse Traynham
Documentation, product testing, and example databases by Daniel Sims

Contact Information

Email: cnsmenu@cnsplug-ins.com
CNS Menu Website: http://cnsmenu.cnsplug-ins.com/
Main Website: http://www.cnsplug-ins.com/
Phone: 817-238-1688
Fax: 817-238-9688

You can write us at:
Comm-Unity Networking Systems
6560 Lake Worth Blvd. Ste. 300
Fort Worth, Texas 76135

Appendix A: Functions

The following is a list of all available functions and a complete description of each.


CNSMenu_Configure

Calling this function with no parameters will show the Configuration Dialog. Specifying a specifc Tab as the first parameter will open the Configuration Dialog to that tab. This function also allows you to get or set any preference from the configuration Dialog.


Example

CNSMenu_Configure
CNSMenu_Configure( "MenuBuilder" )
CNSMenu_Configure( "Get" ; "PopupMenuErrors" )
CNSMenu_Configure( "Set" ; "PopupMenuErrors" ; True )

CNSMenu_DefineMenu

This is the main menu definition function. This function takes your XML menu definitions, parses them, and sets up menus to be displayed. For a complete understanding of this function, please see Appendix B. This function does not require that you use the root <CNSMenu> and </CNSMenu> tags unless you are using an internal DTD for entity definitions. If you do not use one of the root tags, you cannot use the other. In other words, both the opening <CNSMenu> and closing </CNSMenu> tags must be there, or both of the tags must not be there. You cannot have just the opening or just the closing tag.


Example

CNSMenu_DefineMenu( "<menu name='test' script='menu click'><menuitem name='a menu item'/></menu>" )
CNSMenu_DefineMenu( XML_Menus )

Related


CNSMenu_DefineMenuFile

This function is similar to the CNSMenu_DefineMenu function, except that instead of defining the actual XML text, you sepecify a file on the hard drive containing the XML text. The XML file you specify must be a "well-formed" XML document. Unlike the CNSMenu_Define function, the XML file you specify must contain the root <CNSMenu> and </CNSMenu> tags.


Example

CNSMenu_DefineMenuFile( "c:\xmldocs\my_menu.xml" )
CNSMenu_DefineMenuFile( "/xmldocs/my_menu.xml" )
CNSMenu_DefineMenuFile( CNSMenu_File_GetPath( "Database" ) & If( Abs( Get( SystemPlatform ) ) = 1 ; "/" ; "\\" ) & "my_menu.xml" )

Related


CNSMenu_DefineQuickMenu

This function allows you to easily create a menu without using xml. The first two parameters are required. The "Name" parameter is the name of the menu. The "Items" parameter is a return-delimited list of menu items as explained below. The remaining parameters are optional. The "Script" and "DB" parameters allow you to specify the script to be called when a menu item is clicked, and the database that contains that script. If a script is specified and a database is not, the menu will assume the script is in the current database. The "FailScript" and "FailDB" allow you to define a script to be called if the user clicks off a menu without selecting anything. The "Persistent" parameter allows you to tell CNS Menu to save this menu between FileMaker Pro sessions. The "IgnoreMetaTags" parameter allows you to disable the "meta tag" parsing of the menu items as explained below.

The "Items" parameter is a return-delimited list of menu items for this menu. Each line represents one item on the menu. You can specify a value for a menu item by appending a semi-colon and the value onto the end of the item name. For example, if you had "Blue;0000FF" on a line, your menu would have an item with the name "Blue" and when a user selected that item, the value "0000FF" would be returned to your script. For sub-menus, specify the name of the sub-menu, followed by a greater-than sign (">") followed by the next sub-menu name or menu item. For example, if you had "Colors>Red" on a line, your menu would have a sub-menu named "Colors" with an item inside named "Red". Every sub-menu and menu item can be preceded with one or more special "meta tags" to specify different styles and marks for the sub-menu or item name as explained below:

  • ! - the item will appear disabled.
  • $ - the item will require the shift key to be pressed in order to show up.
  • ^ - the item will require the control key to be pressed in order to show up.
  • ~ - the item will require the alt/option key to be pressed in order to show up. (this is the tilde character, which is shifted version of the key to the left of the 1 on English keyboards) (only available on Mac)
  • @ - the item will require the command key to be pressed in order to show up. (only available on Mac)
  • # - the item will appear bold.
  • % - the item will appear italicized.
  • _ - the item will appear underlined.
  • ` - the item will appear with a check mark. (this is the backtick character, which is the key to the left of the 1 on English keyboards) (on Mac, you can also use opt-v to type an actual check mark)
  • * - the item will appear with a bullet mark. (On Mac, you can also use opt-8 to type an actual bullet mark)
  • + - the item will appear with a diamond mark. (On Mac, you can also use shift-opt-v to type an actual diamond mark)
  • = - disable the meta tag processing for the rest of the sub-menu or item name.

You can specify more than one of the above for any item to set multiple attributes at once, with the exception of the check mark, bullet mark, and diamond mark. You can only have one mark defined for a menu item. For example, if you had "!#%Delete Record" on a line, your menu would have an item with the name "Delete Record" that appeared disabled, bold, and italicized. If you need to display a menu item that starts with one of these "meta tags", you can either set the "IgnoreMetaTags" parameter to true, or you can use the equals ("=") meta tag to skip the meta tag processing for the item. For example, if you had "=$4.00" on a line, your menu would have an item with the name "$4.00" instead of a menu named "4.00" that required you to press the shift key in order to make the item visible.


Example

CNSMenu_DefineQuickMenu( "ColorsMenu" ; "Red;1¶Blue;2¶Yellow;3" )
CNSMenu_DefineQuickMenu( "ColorsMenu" ; "Warm colors>Red¶Warm colors>Yellow¶Warm colors>Orange¶Cool colors>Blue¶Cool colors>Green¶Cool colors>Purple¶" ; "Colors Menu Choice" ; "MyDB.fp7" )
CNSMenu_DefineQuickMenu( "Current Fruit" ; "Banana;Cherry;`Grape;Orange" )

Related


CNSMenu_DeleteMenu

This function will delete a previously defined menu. Specify the name of the menu to delete as the parameter.


Example

CNSMenu_DeleteMenu( "My Menu" )

CNSMenu_File_GetPath

You can use this function to return the complete path to a special folder on the local hard drive. The following folders can be returned:

  • Database - a path to the folder containing the current database.
  • FileMaker - a path to the folder containing the FileMaker Pro application.
  • Root - the root of the hard drive.
  • System - a path to the system folder.
  • Desktop - a path to the user's desktop folder.
  • Preferences - a path to the user's preferences folder.
  • Temporary - a path to a temporary folder on the hard drive.
  • Applications - a path to the Applications or Program Files folder.
  • Documents - a path the user's documents folder.

Example

CNSMenu_File_GetPath( "Desktop" )

CNSMenu_GetMenuChoice

This function will return the name or caption of the last menu item the user selected. If you have more than one menu item calling the same script in your database, you can use this function to determine which menu item was actually selected. If you specify a True value for the parameter, it will return the "full menu path" to the menu item the user selected. In other words, if you have a menu named "MyMenu", which contains a sub menu named "Colors", and the user selected the "Red" item in that sub menu, specifying True as the parameter will make this function return "MyMenu/Colors/Red" instead of just "Red".


Example

CNSMenu_GetMenuChoice
CNSMenu_GetMenuChoice( True )

Related


CNSMenu_GetMenuName

This function will return the name of the menu that contains the menu item that the user last selected. If you have more than one menu set up to call the same script in your database, you can use this function to determine which menu was actually used.


Example

CNSMenu_GetMenuName

Related


CNSMenu_GetMenuValue

This function will return the user-defined value of the last selected menu item. When defining your menu items, you can specify any data you want, and then that menu item is selected, you can use this function in the script that is called to retrieve that data.


Example

CNSMenu_GetMenuValue

Related


CNSMenu_GetMouseButton

This function will return a number to indicate which mouse button was last clicked. If you click on a button with the left mouse button, this function will return "1". If you click with the right mouse button, it will return "2". If you click with a third or middle button, it will return "3". This allows your mouse buttons to act independently of each other, such as entering a field with the left mouse button and showing a menu with the right mouse button. You can also use the constant values "CNSMenu_LeftMouseButton", "CNSMenu_RightMouseButton", and "CNSMenu_ThirdMouseButton" to test for which button was pressed. For example, you could have the calculation "If( CNSMenu_GetMouseButton = CNSMenu_RightMouseButton ; CNSMenu_ShowMenu( "RightClickMenu" ) ; CNSMenu_ShowMenu( "LeftClickMenu" ) )" to show either a Left Click Menu or a Right Click Menu depending on which mouse button was pressed.

Example

CNSMenu_GetMouseButton

Related


CNSMenu_GetMouseCoordinates

This function retuns the cordinates of the mouse. The optional parameters are "layout" and "screen". The "layout" parameter returns the cordinates of the mouse in relation to the layout, and the "screen" parameter is in relation to the whole screen. If no parameter is defined, the default setting is "layout".


Example

CNSMenu_GetMouseCoordinates
CNSMenu_GetMouseCoordinates( "screen" )

Related


CNSMenu_ListMenus

This function returns a list of all the currently defined menus.


Example

CNSMenu_ListMenus

CNSMenu_PopupMenuErrors

This function enables or disables Popup dialogs that display menu errors. If a menu item does not have a database or script associated with it, and none of its parent items do, then when the user chooses that menu item, nothing will happen. If PopupMenuErrors has been turned on, then when the user chooses that menu item, an error dialog will pop up indicating the error. This function is useful when troubleshooting your menus and determining why a script is not being called for any specific menu item. To turn on PopupMenuErrors, use any of the following values for the parameter: 1, True, "T", "True", "Y", "Yes", or "On". To turn off PopupMenuErrors, use any of the following values for the parameter: 0, False, "F", "False", "N", "No", or "Off".


Example

CNSMenu_PopupMenuErrors( "Yes" )
CNSMenu_PopupMenuErrors( "Off" )

CNSMenu_Register

This function allows you to register your copy of CNS Menu. There are two ways you can use this function. If you specify "Dialog" as the first (or fourth) parameter, the plug-in will display a dialog asking you to fill in your registration information. Alternatively, you can specify your registration information in the order "First Name" ; "Last Name" ; "Registration Number". Whenever you use this function, you will be presented with a dialog containing our License Agreement for the plug-in that asks you to accept the agreement. If you need to use this function in a startup script to register the plug-in every time the solution starts, you can auto-accept the License Agreement by adding "I Accept The License Agreement" as a forth parameter.


Example

CNSMenu_Register( "Dialog" )
CNSMenu_Register( "First Name" ; "Last name" ; "Registration Number")
CNSMenu_Register( "First Name" ; "Last name" ; "Registration Number" ; "I Accept The License Agreement" )

CNSMenu_SetLayoutPartHeights

This function allows you to define the Part Heights of your Layout so that CNS Menu can correctly place your menus in List View. Call this function before calling CNSMenu_ShowMenu when you are on a Layout that is in List View. Then, in CNSMenu_ShowMenu specify the Left and Top coordinates as if the Layout is being viewed in Form View.


Example

CNSMenu_SetLayoutPartHeights( 25 ; 50 ; 10 )

CNSMenu_ShowMenu

Use this function to show a previously defined menu. You can have the menu popup at the current mouse coordinates, or you can specify where the popup menu should appear. If you want the menu to popup at the current mouse coordinates, just specify the name of the menu (ie. "My Menu"). If you want the menu to popup up at specific coordinates on your layout, you specify the values in the "Left" and "Top" parameters. For the X (vertical, column) pixel coordinate, specify it in the "Left" parameter. For the Y (horizontal, row) pixel coordnate, specify it in the "Top" parameter. An example: "My Menu"; "100"; "200". In all likelihood, if you want to specify coordinates, you will be wanting to line the menu up with some object on your layout. To know the coordinates for the menu to popup at, switch to Layout mode, change the Top and Left margins in the Layout Setup dialog to 0, select the object on the layout, and use the Object Info palette to get the pixel coordinates. The coordinates must be in pixels, so when looking at the Object Info palette, click on the measurement indicator to toggle between inches (in), centimeters (cm), and pixels (px). The "Align" parameter allows you to specify whether the menu will be left, center, or right justified from your cursor or the coordinates you specify. The options are "left", "center", and "right". If no parameter is specified the default value is "left". The last parameter "MinWidth", allows you to specify, in pixels, the minimum width the menu will always appear.


Example

CNSMenu_ShowMenu( "My Menu")
CNSMenu_ShowMenu( "My Menu" ; 100 ; 200 )
CNSMenu_ShowMenu( "My Menu" ; 100 ; 200 ; "center" ; 150 )

CNSMenu_Version

This function returns the current version of CNS Menu. You can also use this function to test whether the plug-in is installed. If you call this function and a question mark ("?") is returned, then the plug-in is either not installed, or not enabled.


Example

CNSMenu_Version

CNSMenu_VersionAutoUpdate

This function returns an Auto Update friendly Version number of CNS Menu. The format of this version number is always exactly 8 digits long. The first two digits represent the major version of the plug-in (zero-filled). The third and fourth digits represent the minor version of the plug-in (zero-filled). The fifth and sixth digits represent the update portion of the version (zero-filled). The final two digits represent a special build number or a beta version number and will usually be zeros.

As an example, for CNS Menu 1.1.5, the major version is 1, the minor version is 1, the update version is 5, and there is no special build or beta version defined. So, the resulting Auto Update friendly version number would be 01010500.


Example

CNSMenu_VersionAutoUpdate

Appendix B: XML Definitions

First, here are a few things to remember about XML: XML is case-sensitive. A tag with the name <menu> is not the same as a tag with the name <MENU> or <Menu>. In the CNS Menu XML Definitions, everything is lowercase except for the root <CNSMenu> tag. This includes attributes; all attributes are in lowercase. Attributes are of the form:

name="value"

or

name='value'

The "value" part must have quotes around it, although they can be single or double quotes.

You can put comments in your XML markup. Comments start with "<!--" and end with "-->", and cannot contain two sequential dashes anywhere in the comment.

Now on to the XML tags found in CNS Menu.


CNSMenu Tag

This is the Root Tag of the CNS Menu XML documents. It is the equivalent of the <HTML> tag in HTML documents. The only tags that can appear inside the root <CNSMenu> tag are the <menu>, <updatemenuitem>, <insertmenuitem>, and <deletemenuitem> tags. This tag has no attributes.


deletemenuitem Tag

This tag allows you to delete a menu item from any menu you have previously defined. This tag is used by itself and does not need to appear within <menu> or <submenu> tags. You need to at least define the name attribute to have a valid <deletemenuitem> tag. This is an empty tag, so you can either use a forward-slash before the closing angled bracket ("/>") or follow the tag immediately with a closing </deletemenuitem> tag. This tag has one attribute, which is required:

name Attribute
Defines the "path" to the menu item that you are deleteing. The "path" is made up of the menu name, followed by any submenu names, followed by the actual name of the menu item, all separated with the forward-slash, and looks like "menu name/submenu name/menu item name". This attribute is required.

Example

<deletemenuitem name="my menu/Click Me" />
Deletes the menu item named "Click Me" from the menu named "my menu".

<deletemenuitem name="my menu/See Also/Plants" />
Deletes the menu item named "Plants" from the sub menu named "See Also" of the menu named "my menu".

insertmenu Tag

This tag allows you to insert any menu into another menu when that menu is displayed. The menu you are inserting does not have to be defined when you define the parent menu (the one you are inserting into), but it does need to be defined by the first time you display the parent menu. The items from the inserted menu are inserted directly into the parent menu. If you want to insert the menu as a sub menu, you must wrap the <insertmenu> tag in <submenu> and </submenu> tags. If none of the menu items from the menu you are inserting have databases and/or scripts defined, then the parent menu's default database and default script will be used. You need to at least define the name attribute to have a valid <insertmenu> tag. This is an empty tag, so you can either use a forward-slash before the closing angled bracket ("/>") or follow the tag immediately with a closing </insertmenu> tag. This tag has three attributes, one of which is required:

name Attribute
Defines the name of the menu you want to insert. When you show the parent menu, this name must equal a name of another menu you have defined. This attribute is required.
groupid Attribute
Defines a user-supplied group identifier for this inserted menu. This is used in conjunction with the modifierkeys attribute to selectively show alternative menu items depending on which modifier keys are held down. See the Hidden Items Example in the CNS Menu example database for examples that use this attribute. This attribute is optional; default value is "".
modifierkeys Attribute
Defines the modifier keys that are required in order to insert this menu. Specify "none" or "shift", "ctrl", "opt", "cmd", or combinations using the plus sign ("shift+ctrl+cmd"). If the specified modifier keys are not held down when the parent menu is shown, this menu will not be inserted. If you are making a cross-platform solution, you will only want to use the "ctrl" and "shift" modifier keys because windows does not have the "opt" and "cmd" keys. This attribute is optional; default value is "none".

Example

<insertmenu name="Layouts" />
Inserts a menu named "Layouts" into the current menu.

<insertmenu name="Hidden" modifierkeys="shift+cmd" />
Inserts a menu named "Hidden" into the current menu if the Shift and Command keys are held down.

insertmenuitem Tag

This tag allows you to insert a new menu item into any menu you have previously defined. The <insertmenuitem> tag is useful for creating menus based on records in a portal. This tag is used by itself and does not need to appear within <menu> or <submenu> tags. This tag is an almost exact replica of the <menuitem> tag, except that you must specify the "path" to the menu item you want to insert before so that CNS Menu knows where to insert the new item. If you want to insert a menu item as the last item on the menu, use "__LAST__" as the item name. You need to at least define the name and before attributes to have a valid <insertmenuitem> tag. This is an empty tag, so you can either use a forward-slash before the closing angled bracket ("/>") or follow the tag immediately with a closing </insertmenuitem> tag. This tag has eleven attributes, two of which are required:

name Attribute
Defines the name of the menu item. This name appears on the menu. If the name is defined as "-", a separator will be placed at this location in the menu instead of a normal menu item. If you are defining a menu separator, only the groupid and modifierkeys attributes will be used; all others will be ignored. The name of the chosen menu item can be retrieved using the CNSMenu_GetMenuChoice function. This attribute is required.
before Attribute
Defines the "path" to the menu item that you are inserting before. The "path" is made up of the menu name, followed by any submenu names, followed by the actual name of the menu item, all separated with the forward-slash, and looks like "menu name/submenu name/menu item name". If inserting as the last item, use "__LAST__" as the menu item like "menu name/submenu name/__LAST__". This attribute is required.
autocreatemenu Attribute
Defines whether or not CNS Menu should auto create the menu or any submenus specified in the "path" from the before attribute if they do not already exist. In other words, if you specify "my menu/Layouts/__LAST__" as the before attribute, but the "Layouts" submenu does not exist, CNS Menu will create it. Specify either "yes" or "no". This attribute is optional; the default value is "no".
db Attribute
Defines the database that contains the script for this menu item. If this is not defined, the default database from the parent submenu or menu will be used. If the parent submenu or menu does not have a database defined, the current database will be used. This attribute is optional; the default value is "".
script Attribute
Defines the script to be called when the user selects this menu item. If this is not defined, the default script from the parent submenu or menu will be used. This attribute is optional; the default value is "".
value Attribute
Defines a user-supplied value for this menu item. This value can be retrieved using the CNSMenu_GetMenuValue function and is also set as the "Script Parameter" if a script is called. This attribute is optional; the default value is "".
enabled Attribute
Defines whether or not this menu item is enabled. Specify either "yes" or "no". If the menu item is disabled, it will appear greyed and the user will not be able to select it. This attribute is optional; the default value is "yes".
groupid Attribute
Defines a user-supplied group identifier for this menu item. This is used in conjunction with the modifierkeys attribute to selectively show alternative menu items depending on which modifier keys are held down. See the Hidden Items Example in the CNS Menu example database for examples that use this attribute. This attribute is optional; default value is "".
modifierkeys Attribute
Defines the modifier keys that are required in order to show this menu item. Specify "none" or "shift", "ctrl", "opt", "cmd", or combinations using the plus sign ("shift+ctrl+cmd"). If the specified modifier keys are not held down when this menu is shown, this menu item will not be shown. If you are making a cross-platform solution, you will only want to use the "ctrl" and "shift" modifier keys because windows does not have the "opt" and "cmd" keys. This attribute is optional; default value is "none".
style Attribute
Defines the font style of this menu item. Specify "none" or "bold", "italic", "underline", or combinations using the plus sign ("bold+italic"). This attribute is optional; default value is "none".
mark Attribute
Defines the mark for this menu item. Specify "none", "check", "bullet", or "diamond". The mark is displayed to the left of the menu item. This attribute is optional; default value is "none".

Example

<insertmenuitem name="Click Me" before="my menu/Testing" script="Menu Item Click" />
Inserts a new menu item named "Click Me" before the menu item named "Testing" on the menu named "my menu".

<insertmenuitem name="Plants" before="my menu/See Also/__LAST__" autocreatemenu="yes" />
Inserts a new menu item named "Plants" as the last item on the "See Also" submenu of the menu named "my menu". If the "See Also" submenu does not exist, CNS Menu will create it.

menu Tag

This tag is the main tag for all menu definitions. You need to define at least the name attribute to have a valid <menu> tag. This tag can contain <menuitem>, <submenu>, and <insertmenu> tags. This tag has eight attributes, one of which is required:

name Attribute
Defines the name of this menu. You use this name when telling CNS Menu to display the menu, when deleting the menu, or when inserting the menu into another menu. This attribute is required.
action Attribute
Defines whether or not this is a new menu or an update to an existing menu. Specify either "new" or "update". This attribute is optional; default value is "new".
defaultdb Attribute
Defines the default database for all the menu items contained in this menu. If you do not specify a database when defining a menu item, this default database will be used. This attribute is optional; default value is "".
defaultscript Attribute
Defines the default script for all the menu items contained in this menu. If you do not specify a script when defining a menu item, this default script will be used. This attribute is optional; default value is "".
defaultvalue Attribute
Defines the default value for all the menu items contained in this menu. If you do not specify a value when defining a menu item, this default value will be used. This attribute is optional; default value is "".
modifierkeys Attribute
Defines the modifier keys that are required in order to show the menu. Specify "none" or "shift", "ctrl", "opt", "cmd", or combinations using the plus sign ("shift+ctrl+cmd"). If the specified modifier keys are not held down when you call CNSMenu_ShowMenu, then the menu will not be shown. Instead, the default script will be called in the default database. If you are making a cross-platform solution, you will only want to use the "ctrl" and "shift" modifier keys because windows does not have the "opt" and "cmd" keys. This attribute is optional; default value is "none".
faildb Attribute
Defines the database that contains the fail script. If the failscript attribute is defined, but this attribute is not, the plug-in will use the current database. This attribute is optional; default value is "".
failscript Attribute
Defines the script the plug-in calls if the user clicks off the menu without selecting anything. This attribute is optional; default value is "".

Example

<menu name="test">
Defines a menu named "test".

<menu name="test" action="update">
Updates the menu named "test".

<menu name="my menu" defaultdb="mydb.fp7" defaultscript="menu click">
Defines a menu named "my menu", whose menu items will use the "menu click" script in the "mydb.fp7" database unless those menu items define their own script and/or database.

<menu name="menu" defaultdb="test.fp7" defaultscript="find all" modifierkeys="ctrl">
Defines a menu named "menu", whose menu items will use the "find all" script in the "test.fp7" database unless those menu items define their own script and/or database. If the Control key is not held down when the CNSMenu_ShowMenu function is called, the "find all" script in the "test.fp7" database will be called instead of showing the menu.

<menu name="menu" failscript="Clear field">
Defines a menu named "menu" which will call the script named "Clear field" in the current database if the user clicks off the menu without selecting anything.

menuitem Tag

This tag is used to define a single item on the menu or submenu. You need to at least define the name attribute to have a valid <menuitem> tag. This is an empty tag, so you can either use a forward-slash before the closing angled bracket ("/>") or follow the tag immediately with a closing </menuitem> tag. This tag has nine attributes, one of which is required:

name Attribute
Defines the name of the menu item. This name appears on the menu. If the name is defined as "-", a separator will be placed at this location in the menu instead of a normal menu item. If you are defining a menu separator, only the groupid and modifierkeys attributes will be used; all others will be ignored. The name of the chosen menu item can be retrieved using the CNSMenu_GetMenuChoice function. This attribute is required.
db Attribute
Defines the database that contains the script for this menu item. If this is not defined, the default database from the parent submenu or menu will be used. If the parent submenu or menu does not have a database defined, the current database will be used. This attribute is optional; the default value is "".
script Attribute
Defines the script to be called when the user selects this menu item. If this is not defined, the default script from the parent submenu or menu will be used. This attribute is optional; the default value is "".
value Attribute
Defines a user-supplied value for this menu item. This value can be retrieved using the CNSMenu_GetMenuValue function and will also be the "Script Parameter" if a script is called. This attribute is optional; the default value is "".
enabled Attribute
Defines whether or not this menu item is enabled. Specify either "yes" or "no". If the menu item is disabled, it will appear greyed and the user will not be able to select it. This attribute is optional; the default value is "yes".
groupid Attribute
Defines a user-supplied group identifier for this menu item. This is used in conjunction with the modifierkeys attribute to selectively show alternative menu items depending on which modifier keys are held down. See the Hidden Items Example in the CNS Menu example database for examples that use this attribute. This attribute is optional; default value is "".
modifierkeys Attribute
Defines the modifier keys that are required in order to show this menu item. Specify "none" or "shift", "ctrl", "opt", "cmd", or combinations using the plus sign ("shift+ctrl+cmd"). If the specified modifier keys are not held down when this menu is shown, this menu item will not be shown. If you are making a cross-platform solution, you will only want to use the "ctrl" and "shift" modifier keys because windows does not have the "opt" and "cmd" keys. This attribute is optional; default value is "none".
style Attribute
Defines the font style of this menu item. Specify "none" or "bold", "italic", "underline", or combinations using the plus sign ("bold+italic"). This attribute is optional; default value is "none".
mark Attribute
Defines the mark for this menu item. Specify "none", "check", "bullet", or "diamond". The mark is displayed to the left of the menu item. This attribute is optional; default value is "none".

Example

<menuitem name="Click Me" />
Defines a menu item with the caption "Click Me" that uses the default database and default script of the parent menu.

<menuitem name="Click Me" script="menu click" value="item4" />
Defines a menu item with the caption "Click Me" that runs the "menu click" script in the default database and returns "item4" when the CNSMenu_GetMenuValue or Get(ScriptParameter) functions are used.

<menuitem name="Hidden" style="bold" mark="bullet" modifierkeys="shift+opt+ctrl+cmd" db="test.fp7" script="hidden"/>
Defines a menu item with the caption "Hidden" that calls the "hidden" script in the "test.fp7" database. This item is displayed in the bold font with a bullet mark on the left, and is only displayed if the Shift, Option, Control, and Command keys are held down.

submenu Tag

This tag defines a submenu of the current menu. You can use this tag to create heiarchial menus. You need to define at least the name attribute to have a valid <submenu> tag. This tag can contain <menuitem>, <submenu>, and <insertmenu> tags. This tag has eight attributes, one of which is required:

name Attribute
Defines the name of this submenu. This name appears on the parent menu where the submenu cascades from the parent menu. This attribute is required.
defaultdb Attribute
Defines the default database for all the menu items contained in this submenu. If you do not specify a database when defining a sub menu item, this default database will be used. This attribute is optional; default value is "".
defaultscript Attribute
Defines the default script for all the menu items contained in this submenu. If you do not specify a script when defining a sub menu item, this default script will be used. This attribute is optional; default value is "".
defaultvalue Attribute
Defines the default value for all the menu items contained in this submenu. If you do not specify a value when defining a submenu item, this default value will be used. This attribute is optional; default value is "".
enabled Attribute
Defines whether or not this submenu is enabled. Specify either "yes" or "no". If the submenu is disabled, it will appear greyed and the submenu will not appear when the user places their cursor over it. This attribute is optional; default value is "yes".
groupid Attribute
Defines a user-supplied group identifier for this submenu. This is used in conjunction with the modifierkeys attribute to selectively show alternative menu items depending on which modifier keys are held down. See the Hidden Items Example in the CNS Menu example database for examples that use this attribute. This attribute is optional; default value is "".
modifierkeys Attribute
Defines the modifier keys that are required in order to show this submenu. Specify "none" or "shift", "ctrl", "opt", "cmd", or combinations using the plus sign ("shift+ctrl+cmd"). If the specified modifier keys are not held down when this menu is shown, this submenu will not be shown. If you are making a cross-platform solution, you will only want to use the "ctrl" and "shift" modifier keys because windows does not have the "opt" and "cmd" keys. This attribute is optional; default value is "none".
style Attribute
Defines the font style of this submenu. Specify "none" or "bold", "italic", "underline", or combinations using the plus sign ("bold+italic"). This attribute is optional; default value is "none".

Example

<submenu name="Go to Layout">
Defines a submenu named "Go to Layout".

<submenu name="Go to Layout" defaultdb="main.fp7" defaultscript="Change Layout">
Defines a submenu named "Go to Layout", whose menu items will use the "Change Layout" script in the "main.fp7" database unless those menu items define their own script and/or database.

<submenu name="Special" enabled="no" style="italic">
Defines a submenu named "Special" that is disabled and whose name is displayed using the italic font.

<submenu name="Hidden" modifierkeys="shift+ctrl" groupid="hidden">
Defines a submenu named "Hidden" that is only displayed if the Shift and Control keys are held down when showing the menu.

updatemenuitem Tag

This tag allows you to update the attributes of any menu item on any menu you have previously defined. The <updatemenuitem> tag is useful for enabling a previously disabled menu item (or vice versa), placing a mark next to an item, or changing any other attribute assocated with a menu item. This tag is used by itself and does not need to appear within <menu> or <submenu> tags. This tag is an almost exact replica of the <menuitem> tag, except that instead of specifying just the name of the menu item, you must specify the "path" to the menu item so that CNS Menu knows which item to update. Only those attributes that you define will replace the original menu item's attributes. You need to at least define the name attribute to have a valid <updatemenuitem> tag. This is an empty tag, so you can either use a forward-slash before the closing angled bracket ("/>") or follow the tag immediately with a closing </updatemenuitem> tag. This tag has nine attributes, one of which is required:

name Attribute
Defines the "path" to the menu item that you are updating. The "path" is made up of the menu name, followed by any submenu names, followed by the actual name of the menu item, all separated by the forward-slash, and looks like "menu name/submenu name/menu item name". This attribute is required.
db Attribute
Defines the database that contains the script for this menu item. If this is not defined, the default database from the parent submenu or menu will be used. If the parent submenu or menu does not have a default database, the current database will be used. This attribute is optional; if the attribute is missing, the original database attribute will be unchanged; if the attribute exists, but is set to "", the original database attribute will be cleared.
script Attribute
Defines the script to be called when the user selects this menu item. If this is not defined, the default script from the parent submenu or menu will be used. This attribute is optional; if the attribute is missing, the original script attribute will be unchanged; if the attribute exists, but is set to "", the original script attribute will be cleared.
value Attribute
Defines a user-supplied value for this menu item. This value can be retrieved using the CNSMenu_GetMenuValue function and is also the "Script Parameter" if a script is called. This attribute is optional; if the attribute is missing, the original value attribute will be unchanged; if the attribute exists, but is set to "", the original value attribute will be cleared.
enabled Attribute
Defines whether or not this menu item is enabled. Specify either "yes" or "no". If the menu item is disabled, it will appear greyed and the user will not be able to select it. This attribute is optional; if the attribute is missing, the original enabled attribute will be unchanged.
groupid Attribute
Defines a user-supplied group identifier for this menu item. This is used in conjunction with the modifierkeys attribute to selectively show alternative menu items depending on which modifier keys are held down. See the Hidden Items Example in the CNS Menu example database for examples that use this attribute. This attribute is optional; if the attribute is missing, the original groupid attribute will be unchanged; if the attribute exists, but is set to "", the original groupid attribute will be cleared.
modifierkeys Attribute
Defines the modifier keys that are required in order to show this menu item. Specify "none" or "shift", "ctrl", "opt", "cmd", or combinations using the plus sign ("shift+ctrl+cmd"). If the specified modifier keys are not held down when this menu is shown, this menu item will not be shown. If you are making a cross-platform solution, you will only want to use the "ctrl" and "shift" modifier keys because windows does not have the "opt" and "cmd" keys. This attribute is optional; if the attribute is missing, the original modifierkeys attribute will be unchanged; if the attribute is "none", the original modifierkeys attribute will be cleared.
style Attribute
Defines the font style of this menu item. Specify "none" or "bold", "italic", "underline", or combinations using the plus sign ("bold+italic"). This attribute is optional; if the attribute is missing, the original style attribute will be unchanged; if the attribute is "none", the original style attribute will be cleared.
mark Attribute
Defines the mark for this menu item. Specify "none", "check", "bullet", or "diamond". The mark is displayed to the left of the menu item. This attribute is optional; if the attribute is missing, the original mark attribute will be unchanged; if the attribute is "none", the original mark attribute will be cleared.

Example

<updatemenuitem name="my menu/Click Me" enabled="no" />
Updates the "Click Me" menu item in the menu named "my menu" to be disabled.

<updatemenuitem name="my menu/Go to Layout/Main" mark="check" />
Updates the "Main" menu item in the submenu "Go to Layout" of the menu named "my menu" to be checked.

<updatemenuitem name="test menu/Item4" db="" script="" />
Clears the database and script attributes of the "Item4" menu item in the menu named "test menu".

Appendix C: Function Error Responses


Understanding Error Responses

Every function in CNS Menu returns a response indicating the success or failure of that function. If the function is successful, it will return a response indicating that it set the value you were trying to set, or completed the task that needed to be completed. If however, the function is not successful, it will return an Error Response. This Error Response is in the form of:

ERROR: <Function Name>: <Error Description>

For example, if you forgot to specify the FileName of the XML file you are trying to load with the CNSMenu_DefineMenuFile function, then that function will return the following Error Response:

ERROR: DefineMenuFile: You must specify a FileName.

Error responses always start with the word "ERROR" in all caps, followed by a colon, followed by the function that had the error, followed by a colon, followed by the actual error that occurred. You can use the various FileMaker Pro Text Functions to extract the different parts of the Error Response for your own use. For instance, if you want to know if the response you just got back was an ERROR, you can use the LeftWords function to return the first word and see if it is an error.

  1. Set Field [Result, CNSMenu_DefineMenu( XML_Menu_Defs )]
  2. If [LeftWords( Result ; 1 ) = "ERROR"]
  3. <inform the user there was an error in the XML and exit>
  4. End If